Getting started with InfluxDB
In the DBOD service, InfluxDB version 1.8 is the latest version supported since 2020. We do not have the intention to support higher versions, and we recommend new users to better use alternatives like Grafana Mimir (CERN IT Monitoring Service) or TimescaleDB (Database on Demand Service) to store time-series data.
This is a quick guide to start using InfluxDB v1.8 time series database.
For a complete documentation reference about InfluxDB please check the official documentation site.
Database clients
InfluxDB provides an HTTP API interface so any HTTP client (e.g. curl) can be
used to interact with the database.
The official influx command line interface (CLI) is an interactive shell for
the HTTP API. You can install the CLI downloading version 1.8 for your OS
from https://www.influxdata.com/downloads/ under 'InfluxDB OSS 1.x'
Connecting to the database
To connect to your database using the influx CLI tool, use the following command:
influx --username <my_username> --password '' --ssl -host <my_hostname>.cern.ch -port <my_port>

# In MacOS you might need to add '--unsafeSsl' if you don't have the CERN CA certificates configured:

influx --username <my_username> --password '' --ssl -host <my_hostname>.cern.ch -port <my_port> --unsafeSsl
The username, password, and hostname will be given to you by the DBOD service managers through a SNOW ticket when you request a DBOD instance. Remember that for any DBOD instance name, there is a functional IP alias associated: dbod-\<instance_name>.cern.ch (underscores '_' in instance names are replaced by dashes '-')
If the connection is successful the console will ask you for your password.
Note: to use SSL, you might need to install CERN certificates on your machine. Otherwise, you can get unclear messages such as:
Failed to connect to https://dbod-xxx.cern.ch:yyy
Please check your connection settings and ensure 'influxd' is running.
Starting an interactive read-eval-print-loop (REPL) session with Flux support
Unless specifically disabled on request Flux support is enabled by default in all DBOD influxdb instances.
This allows to start an interactive session with flux support and accessing the /api/v2/query default endpoint.
To start an interactive session with Flux support you need to add -type flux to the influx CLI tool command line.
Due to a known bug you also need to specify the default API
-path-prefix /api/v2/query as otherwise any query will return an error like for example:
> buckets()
Error: 404 page not found
: 404 Not Found
Configuring an InfluxDB data source with Flux support in Grafana
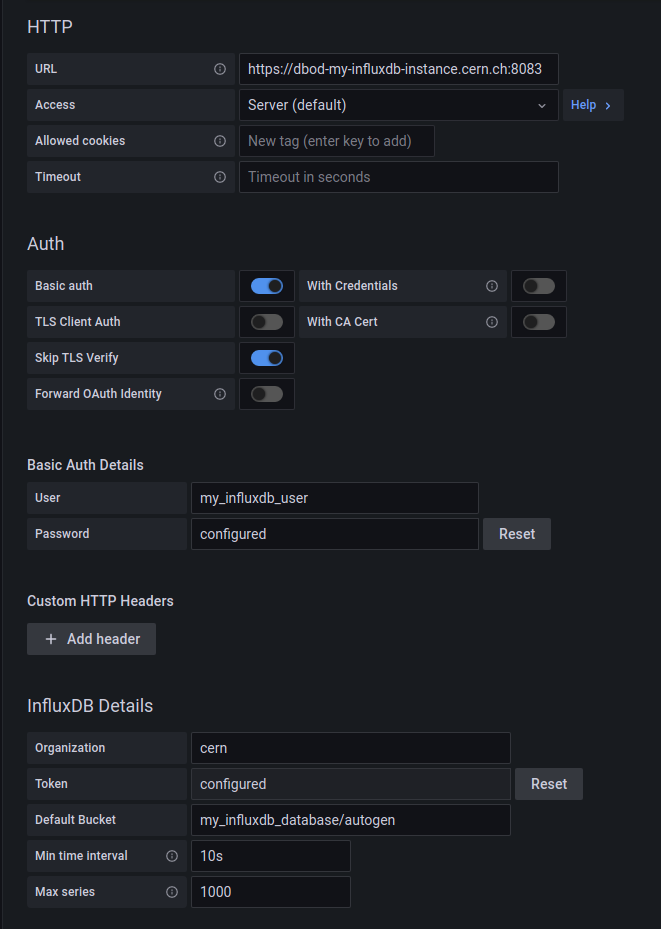
Assuming the instance to access from grafana is my_influxdb_instance (please notice: _ is always substitued with
- in dns hostnames/aliases), configured to listen on port 8083, the user to connect with is my_influxdb_user and
the database (bucket) containing the data is my_influxdb_database,
You can configure the corresponding InfluxDB data source with Flux support in Grafana, using the configuration parameters depicted in the following picture:
NB: It could be helpful to verify first that everything works as expected as described above in Starting an interactive read-eval-print-loop (REPL) session with Flux support
User management
The owner of the database instance will be considered the database administrator (DBA). The database instance will be created with at least three initial users named ["admin", "dod_influx", "dod_dbmon"]. The "admin" user has full administrator capabilities and is the account you will use to administrate your instance. As mentioned before, the initial password for the "admin" user will be provided in the SNOW ticket.
NOTE: You must change that initial password before starting any operations!!
The "dod_influx" and "dod_dbmon" are special accounts used by the DBOD service for management and monitoring purposes, so you must not change any parameter related to those accounts!. Any modification affecting those could interfere with the correct behaviour of the platform, and will be considered a break of the user agreement.
As a DBA, you will have the ability to create new users and control and modify their access privileges. For further information about how to correctly manage user privileges and accounts in InfluxDB please head to the official documentation.
Set/change password
From the influx CLI:
SET PASSWORD FOR "admin" = 'my_new_admin_password'
A warning regarding passwords and the CLI
We have noticed that some passwords containing characters such as '-' can be
incorrectly parsed and used by the influx CLI. They will work when setting up
the accounts on the DB, and will work normally when used on libraries or
in a low level curl call but an error creating the connection will be shown when
trying to connect using the CLI.
A note about sending data from collectd agents
The recommended way to send data from collectd to an influxdb instance is to use telegraf.
- this is how the telegraf configuration looks like for sending to influxdb:
[[outputs.influxdb]]
urls = ["https://dbod-<your-instance>.cern.ch:80xx"] # required
database = "telegraf" # required
retention_policy = ""
write_consistency = "any"
timeout = "5s"
username = "<your-user>"
password = "<your-password>"
- For the collectd part, you can find a good example here: https://github.com/influxdata/telegraf/tree/master/plugins/parsers/collectd